In my previous article i have explained about Sitecore MVC View Rendering using Glass Mapper. Now i'm going to explain about Sitecore MVC Controller Rendering using glass mapper.
Controller Rendering:
In controller rendering you need to specify a controller and an action name on the component definition item. Rendering engine invokes an action method in a controller class.
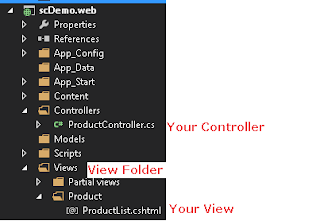
Visual Studio Project:
Controller Code:
Creating model:-
While creating model just keep few things in your mind.
1. Define your TemplateId
2. Declare your template fields as properties.
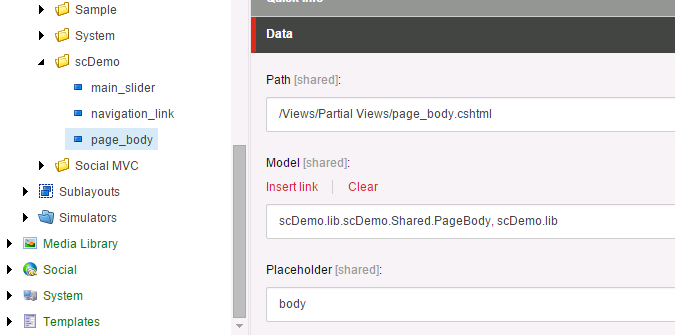
@Html.Sitecore().Placeholder("body")
Binding Model with View
To make a field editable in Experience Editor, you can use the Editable method in this way:
Controller Rendering:
In controller rendering you need to specify a controller and an action name on the component definition item. Rendering engine invokes an action method in a controller class.
- Controller rendering support separation of concerns by adding controller logic not in the model (state) or the view (presentation).
Creating Controller Rendering:
1. Go to Sitecore> Layout> layouts> Renderings> {your project folder}> {controller rendering}
2. Controller Name:- write your controller name.
3. Controller Action:- write name of your Controller Action that you want to render.
3. Controller Action:- write name of your Controller Action that you want to render.
3. Placeholder:- here you need to write your placeholder key.
Installing Glass mapper
Glass.Mapper is distributed using Nuget package management. You can install Glass.Mapper using one of the following simple commands in the Package Manager Console:
PM> Install-Package Glass.Mapper.Sc
Visual Studio Project:
Controller Code:
   public ActionResult ProductList()
        {
            return View();
        }
Creating model:-
While creating model just keep few things in your mind.
1. Define your TemplateId
2. Declare your template fields as properties.
 [SitecoreType(TemplateId = "{F9F7EE30-4594-4D13-9A0A-0E6BF2D69461}", AutoMap = true)]
    public interface ProductItemChildren : IBaseType
    {
        [SitecoreField("Product Name")]
         string ProductName { get; set; }

        [SitecoreField("Product Price")]
         string ProductPrice { get; set; }

        [SitecoreField("Product Image")]
         Image ProductImage { get; set; }

        [SitecoreField("Product Description")]
         string ProductDescription { get; set; }

        [SitecoreField("Button Text")]
         Link ButtonText { get; set; }
}@Html.Sitecore().Placeholder("body")
Binding Model with View
To make a field editable in Experience Editor, you can use the Editable method in this way:
@inherits Glass.Mapper.Sc.Web.Mvc.GlassView<scDemo.lib.scDemo.Folders.ProductItemFolder>
<div class="col-lg-12">
    <ul class="product-listing">
        @foreach (var item in Model.ProductItemChildren)
        {
            <li>
                <h3>@Editable(item, x => x.ProductName)</h3>
                <h4>@Editable(item, x => x.ProductPrice)</h4>
                @RenderImage(item, x => x.ProductImage, isEditable: true)
                <span>@Editable(item, x => x.ProductDescription)</span>
                @RenderLink(item, x => x.ButtonText, isEditable: true)
            </li>
        }
    </ul>
</div>


